Do or DIY...
I love this time of year! Although
the daylight hours are shorter, the weather cold and often damp, it’s the perfect season to wrap up warm, batten down the hatches and get craftin’!
However, I can't hide indoors all winter and those same shorter, colder days spent outside at the
mercy of the soggy British weather always trigger a want for better, warmer, updated kit.

This annual winter requirement for
good gear that really works seems to tie in perfectly with those long, dark
winter evenings and cold, rainy days trapped indoors. A kind of evolutionary
symbiosis between the need for stuff and the opportunity to make stuff that’s
been repeated year on year, since the first person decided ‘it’s a bit fresh
outside the cave, let’s spend this evening making those furs into a coat’.
It
has been said that the invention of the bone needle was one of our most significant
game changers, allowing aforementioned furs to be properly tailored, maintained and
repaired in order to keep body heat in and cold weather out. Even just a couple of generations ago, it was
common place for our more thrifty grand-parents to possess this make do and
mend mind-set, darning socks, frantically knitting scarves, improvising and inventing
whenever the need arose. This is most
definitely a quality to be admired and aspire to rather than just viewed as a
nostalgic memory; especially in recent years as we struggle to reverse the effects
of several decades trapped in what we now view clearly as an increasingly throw-away society.
Nowadays many outdoor clothing
manufacturers are making moves to embrace recycled, natural and more sustainable
materials, however big outdoor brands are still constantly having to re-invent
the wheel to maintain a foothold in the retail marketplace, frequently updating
designs and changing colour schemes to stay ahead of the game and give us all
something new and shiny to lust after.

Historically I’m not completely
immune to the lure of shiny new crap I don’t really need but as a ‘maker’ I do
feel I’m slightly more resilient to the hypnotic power of outdoor gear
advertising, having the choice to make my own version by buying materials cheaply,
recycling or ideally utilising renewable and free natural resources. Often my
time is the only significant cost!
In fact I’ve become almost smugly
militant about not buying new gear when I know I could make something myself to
fulfil the same task.
Having said that, I do accept that
it’s extremely difficult to resist the constant and subliminal drip feed of the
advertisers, informing us that it will be absolutely impossible to enjoy the
great outdoors without the latest folding, titanium, marshmallow toasting fork.
Luckily amongst the bushcraft community, to balance this nonsense out there’s
also the terrifying horror of being thought of as having ‘all the gear but no
idea’. Nobody wants to be that guy! But…. you do still want the shiny gear…..
What better way to affirm your genuine connection with the hardcore
bushcrafters of yesteryear than actually making the gear?!
It’s impossible to have no idea if
you’ve actually made the gear...
So we’ve established a certain level
of ‘smugness’ on my part when it comes to all of the above, but recently I
wondered, how ‘DIY’ am I when it comes to outdoor kit? I know how to sew clothing and footwear, weave a basket or two and craft wood, clay and bark into all sorts of interesting things but at what point can someone
feel completely self-reliant, enough to provide EVERYTHING they need? Even
then, is it all genuinely practical and useable in the modern day? It turns out
there’s definitely room for improvement before I’m qualified to fully engage
smug mode, but I reckon I'm heading down the right path.
But for now, I’ve compiled a list
of the self-made kit that I use most regularly (which if you’ve spent time with
me in the woods you’ll no doubt be familiar with), plus some information on how
and why I made them; they all have their own story to tell. I deliberately
haven’t included any items that border on ‘historical re-enactment’ , are only
designed for a very particular task or look really pretty but are often left on the
shelf in favour of a more practical alternative. These are purely DIY kit items in
constant use, that have proved themselves to be just as good, if not better
than any off the shelf, possibly mass produced alternative.
It’s worth pointing out that I’ve
received very little formal training to make the majority of the items listed,
the joy of discovery and learning through doing being a major part of the
attraction. With that in mind, I hope any fledgling makers out there will see
that their weird compulsion to ‘make stuff’ can indeed have a practical
application and anyone with a will, can get involved.
For those of you that maybe haven’t
got the time to get into making but do appreciate hand-made kit and can
recognise it’s many benefits in terms of it's high quality, the makers attention to
detail, lower environmental impact or just ‘keeping hard won
skills alive’, there are crafts people and cottage industries out there doing
all of the above just for you! In reading this you MUST appreciate the hard
work and devotion that goes into everything they do; check ‘em out when you get
the chance!
However, if you are keen to learn
more about DIY kit, read on. For me, making my own gear has always been an
extension of my interest in bushcraft, survival and self-reliance. I’m hoping
to explore this further and in more depth in a follow up book (or books) to the Wilderness Survival Guide.

1. Firstly, the billy can is
representative of a time that seems to have come and gone, Myself and other long
standing campfire enthusiasts often lament it’s passing and use it as an
example when harking back to the ‘good old days’ of survival training and bushcraft.
It’s just a stainless steel coffee tin from a kitchen shop, with a fencing wire
bail handle and a simply carved wooden knob. Using a coffee tin as a billy can was not my
idea but it’s a good one and prior to this I (and others) used old catering
bean cans and similar recycled metal containers to cook up a stew over the campfire. Basically it was a
time when we recognised a need for a certain bit of kit and set about making or
improvising our own, which worked just fine! At best, you would set out on a
long and drawn out search through boot sales and army surplus shops looking for
something that would ‘nearly’ do the job. Nowadays, a quick Google search and a
browse through Amazon’s vast virtual warehouse and a day later, delivered to
your very door is the latest all singing, all dancing mega billycan mark seven
‘sport version’ endorsed by an outdoory celeb. I can’t help feeling as though a big part of
the process of recognising a need for something and then coming up with a
solution, has been somewhat lost along the way.

2. The birch spoon is also representative, but of all the many wooden utensils I’ve carved for the kitchen at home
and also the base camp kitchen in the woods (the beauty of carving your own spatulas
and stirring spoons is that they’re so quick and easy to knock up it would be a
crime to buy the factory made treen from the supermarket, no matter how cheap it might be),
however, this one is my current favourite, often carried as part of a little
demo kit to pass round on foraging walks
3. Wooden cup or ‘kuksa’. Although it doesn’t look it anymore, this cup
is also carved from birch. It was carved from semi-seasoned wood, out in the forest using an axe, knife and a small crook knife to hollow it out. I used it
for a bit (until my next favourite came along – I have a string of
ex-cupfriends, something I’m not proud of). I couldn’t bring myself to say
goodbye so it spent the next few years hanging off the main kettle tripod in
camp as a ladle, hence the lush wood smoke stained patina. Always confusing
when you bump into your ex and they’re all tanned and smelling gorgeous…
4. Take down wooden bucksaw – this one
is made from seasoned oak, with a solid mortice and tenon construction. A no nonsense,
lightweight frame saw for sectioning quite hefty timber, which comes apart and
can be carried unobtrusively in a slim canvas sleeve. An age old design but
this one’s mine
5. Buckskin Moccasins. I have lots of moccs now but these must be getting on for nine years old. I’d made simpler versions prior to these, but this style
was an itch I’d been needing to scratch for a while. They were based on the cartoony
illustrations of the woodland moccasins I’d coveted from the Ellsworth Jaeger
book ‘Wildwood Wisdom’ but with a few of my own additions (sewn in tongue,
rubber soles). I also made the buckskin first from a fallow deer hide using
brains, smoke and elbow grease, so it feels as if I actually conceived and gave
birth to them!! I wear them in the woods when we’re doing something
sneaky or my other footwear needs to dry out but they’re lightweight and
squishy enough to be always there when I need them, like a pair of comfortable old
slippers...but don’t call them slippers!

6. DPM camouflage basha tarp. I made
this lightweight tarp around fifteen years ago, having used something similar
(but smaller and also heavier!) in the Army. It was probably the largest thing
I’d made using a sewing machine up to that point, but despite this, was quite
easy to put together. I bought the PU nylon and iron on seam sealing tape from
Point North (https://www.profabrics.co.uk/ ) and opted for guy line loops made
from the same material to keep the design simple and minimalist. Although I’ve since moved onto
other tarps, this one is loaned out regularly to visiting course students and
it’s still going strong!

7. Leather belt and knife sheath. This
belt is becoming a bit like Triggers broom (“I’ve had the same broom for twenty
years but it’s had 17 new heads and 14 new handles”). The buckle is from a belt
I bought about thirty years ago and once it seemingly came to the end of it’s
days, it was a relatively easy job just to replace the leather part and carry on wearing it. Soon the buckle
will need replacing and then the leather again and so it’ll continue until I pass it onto my children for them to continue the never ending tradition. The
sad truth is that when I replaced the leather in my early thirties, I added a
good amount of extra length so it could be used as a knife strop. I’m not sure
where that extra leather has gone now that I’m past my mid-forties…perhaps the
belt has shrunk…yep it’s definitely shrunk…
The knife sheath was made from the
same veg tan saddlery leather and has happily held my main belt knife for the best part of a decade.
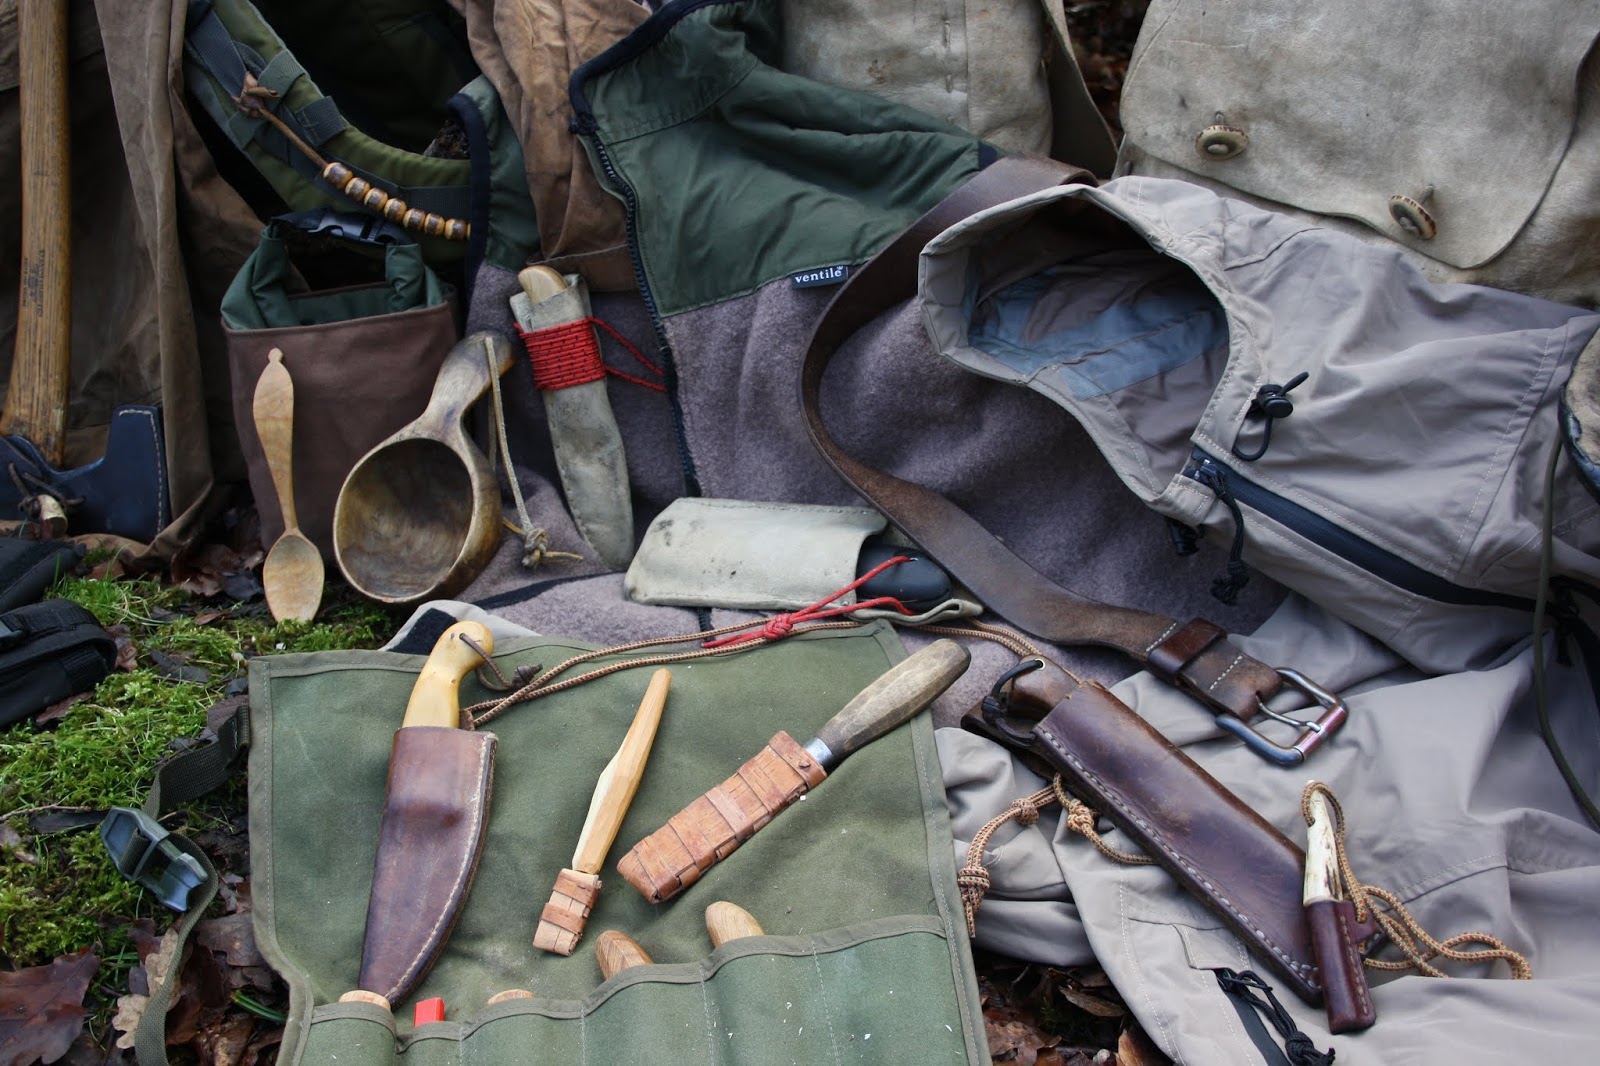
8. Tool roll and carving kit. I needed a
compact but tough tool roll for my carving kit so it could be easily included
or excluded from my standard outdoor equipment depending on my plans. One neat compact little unit, everything in it's place, nothing
forgotten. The green canvas came from an old army camp bed and the QR buckle
and strap up-cycled from an old Berghaus rucksack. Additional home-made kit
that lies nestled within are my whittling knives. The blades are from several
different sources but the handles are home made from box, yew and beech. The
sheaths are also home-made from cow hide and folded birch bark

9. Buckskin haversack, duffle bag,
folding saw sheath and knife sheath. I
love to make buckskin but I REALLY love making useable, practical kit from it.
Buckskin moccasins and clothing have their place and look fantastic but I’m
unlikely to wear them all the time. However these bags are in constant daily
use and will easily outlast their cordura or canvas counterparts. The
haversack, complete with oak bark tan shoulder strap, chunky thong stitching
and antler buttons recently travelled to Holland with me as hand luggage. Not
one person in the airport started whistling the theme tune from ‘Last of the Mohicans’ at me, in fact I’m positive everyone wanted to know where they could
buy one, but were probably too polite to ask!


The buckskin duffle was originally tasked with carrying my water bottle and mug, first aid kit, waterproof jacket, lunch – my
day to day essentials in the woods. The haversack has now willingly accepted
that role leaving the duffle to dutifully deal with carrying my sewing and
leatherworking kit plus a project or two.
When I tan a large fallow buck hide, I accept that the thick neck is not
going to end up velvety soft (lazy ....or sensible?..). However, this thicker,
stiffer section makes great sheaths as they require a little extra rigidity and
strength. The little buckskin neck knife sheath feels warm and pleasant next to
the skin and the belt sheath holding the Silky saw is perfect for the job,
tough, quick drying and as cool as a penguins undercarriage.

10. Pacing beads. These are used when navigating over
distance in poor visibility. Basically you count your paces along a certain bearing or route which gives you a
fairly accurate indication of how far you’ve travelled. This valuable info is then relayed to the map so you can constantly check where you should be, even if you can't pick out distant landmarks on the ground.
To make this job
easier, each leg is broken down into 100 metre chunks and every time one of
those chunks is completed, a single bead is moved to the other end of the cord
they hang off. If you lose count, you can refer back to the beads. You can buy
military looking pacing beads or string several cord-locs onto some colourful
paracord. Of course, I painstakingly hand carved these from a hazel stick after
first, drilling carefully through the centre, then strung them all onto a
leather cord. It was fun to do and aside from their practical use, they break
up the otherwise ‘military’ appearance of an army green rucksack. I suppose I'm
a bit like the boring bloke in the office, sporting surfer bracelets
with his suit and tie. “Check me out everyone – I’m way more interesting than you might think”
Tragic...

11. Wool gilet. I love a gilet – such a practical bit of clothing
when working in the woods! This one was made from an old wool blanket, dyed and
boil washed to thicken it up. Warm wool clothing has long been a favourite for people who work
outdoors. The close weave, blanket-like wool works well as an outer garment too
as it’s tough and hardwearing and will still keep you warm if it gets damp in
the rain. It can also be treated with lanolin to increase weatherproofing. However,
the long sleeved, long tailed, hooded coats can be bulky if carried rather than
worn. The gilet is a great way of getting a bit of wool in your life and cutting
down on bulk in your rucksack at the same time.
I find that I wear one a lot
more than I’d wear a long sleeved wool shirt and because I wear them so often,
I added some Ventile shoulder protection to this one to give it a better chance
of shrugging off the odd shower. If you’re carrying a single layer ventile
smock or jacket as your weatherproof layer, this wool/ventile combo makes the
perfect under layer giving you a second layer of ventile on the shoulders and
then warm wool between you and the ventile cotton (which although will have
swelled it’s fibres to stop anymore water getting through, will still feel cold
and damp to the touch).

12. Weatherproof hooded smocks – Ventile cotton
and breathable waterproof fabric. One of
the attractions of survival, bushcraft and self-reliance as a life style is the
comforting feeling of being able to provide. At its most basic and introductory
level, this would mean providing shelter and warmth, a fundamental human need.
Successfully crafting my own weatherproof outer layers, for me, is an extension
of that ability to find or build shelter. In being able to create my own
personal micro-climate, regardless of the weather, I’m positively taking charge
of my own destiny! So, one way or another, making my own weather proof layers
was inevitable; but there is another reason.

Probably due to all of the above
points, a good weatherproof jacket seems to be one of the most costly
investments when getting kitted up for the great outdoors! Out of all the items
I've listed here, these are probably the only ones that have been self-made in order
to save a few quid. There are some amazingly well designed and constructed
jackets out there today but as a self- employed parent of two, they are pretty
much all well outside my budget. However, the amazing weatherproof fabrics they’re
made from can be bought off the roll (in most cases, unless the fabric has been
developed and patented by the company that makes the clothing…but you’ll find
something similar) so if you have the time and a sewing machine (mine cost
about fifty quid from Argos) you can have fun making your own.
Start with
something simple, like a poncho – an incredibly useful garment and shelter all
in one! These two smocks are again representative of the many I’ve made over
the years, including as gifts for friends and family (the image below shows a pair of cosy wool lined, ventile salopettes I made for my son from upcycled clothing). Each time I make another the design
improves and more features are added; upgrades that are borne from experience and necessity rather
than influenced by fashions.

13. Wool ‘jumper’ hat. There’s
a bit of a standing joke here at Wilderness Survival Skills that whenever I
have a nice wool jumper, at some point it’ll inevitably shrink and at that
point it’ll be donated to one particular, more diminutive friend. However, I
really didn’t want to give this one up so I kept it and turned it into a hat!
It’s built around, and stitched to a thin fleece liner hat I already had so is one of the warmest hats
I’ve ever owned. Hats like this are a great starter project that get you used
to turning measurements and flat patterns into a three dimensional object. They
don’t use much fabric and if you muck it up, you won’t have invested as much
time as a jacket…and there’s always someone with a smaller or larger head you
can give it to!

14. Leather axe mask for a small forest
axe. This axe mask probably isn’t one of
my neatest pieces, but it was made a long time ago out of necessity rather than
wanting to ‘upgrade’ the one it came with. It also serves as a constant reminder of an embarrassing
error that I’ll happily pass onto students as an example of how easily an
accident can happen when using sharp tools outdoors. To cut a long story
short…Scotland in November…instructing on a five day course…limbing a fallen
fir tree…tired…hungry…getting dark…in a hurry…forgot to take off the axe mask
and ended up chopping right through it, rivets and leather flying everywhere. Still, nobody got hurt (apart from the axe
edge and my pride) and sometimes you need a good reason to make new stuff!

15. Tipi and half liner. This was a big project! I was keen to have a
sort of ‘base camp’ tent that I could sleep in, store kit in, sit and move around in if the weather was bad and would be able to sleep me plus two kids comfortably
or even fit a wood burning stove in winter. It had to be big enough to do all
of these things but also small and light enough to hike with alongside my
standard outdoor kit. I can trim the weight down further by improvising pegs and
a pole from wood I gather once on site or even suspending the tipi from an
overhead branch, therefore doing away with the need for a central pole. Finished
packed weight of the outer and liner is around 3.5kg. It’s six sided, single skin PU nylon in a wonderful
camouflage of green and black splodges (perfect in a dappled coppice woodland)
with sealed seams, extra guying off points, a large door and a removable ‘hat’
if more ventilation is needed.

I got lucky with the Danish
camouflage waterproof fabric and even more so as it was on offer in a
sale – there was just enough for the size I was after! This meant I could pay a bit more for
the tough, rubberized groundsheet material and the insect proof netting needed
to make the half sized, fully enclosed inner compartment. Getting all the angles right and maximising
the amount of fabric I had, to end up with the largest size finished tipi I
could, was certainly a head scratcher, but it all came together nicely in the
end! The design certainly isn’t my own and there are similar products already
available, but this one is lighter than many you can buy online, cost about a
tenth of the price of an off the peg tipi and I’m pretty sure nobody else has
one in such a lovely camouflage pattern. It’s unique!

16. Lastly...various sewing machine projects, new
and old – padded cordura pouches for penknives, compasses and the roll top carry bag
for my tipi, a tough but lightweight canvas and ripstop fabric cookset pouch, a waterproof first aid
and emergency kit belt pouch plus pertex water filter bag attached to the integral QR belt.

I’ve lumped all these sewing projects
together as, although the older ones have been kicking about in my kit for
years and others are recent additions, they have all been made specifically to
fulfil a task when I could have just as easily have bought something similar
for a few quid. However, these are bespoke, made just for that task. They
often have little extra touches I can't find anywhere else (additional
pockets, straps, padding etc) and they’re small enough that I generally have offcuts
from previous projects that will do the job or I can upcycle something else I don’t
use anymore. They’re relatively quick and easy to put together and in making them, I am
recognising a need for a certain kit item and then finding the solution myself...
Just
like the old days!
In summary...
One factor I’ve noticed that seems to bother all amateur
makers, (including myself in the past) is a concern that you’re not doing it
‘right’. I’m not sure there is ever a ‘right way’ – just YOUR way! If it works
it then it must be the right way! If there’s a better way you’ll discover it
for yourself at some point. I couldn’t tell you the names of many of the
stitches and seams that I use, but they work for me. When you’ve figured out
how to do something all by yourself, through trial and error, you own that technique! There’s no better
way to learn and whatever it is you’ve made will be way more valuable to you than
anything you could ever buy in the shops!
Happy craftin' !