Sunday, 5 January 2014

A Week in the Wilds part 3: Bush Crafts

A Week in the Wilds part 3...the story continues...


With the Hunter Gatherer challenge week already taking bookings for October 2014 I thought I should get back on here and conclude the story of my own experiences whilst taking part in the course during the autumn of 2012. Part one gave an outline of the challenge, what would be required, the tools and equipment we took and explained my own strategy in achieving the basic essentials for survival outdoors, most of which needed to be completed on the first day! Part two took a detailed look at my strategy for gathering, processing, cooking and storing enough wild food to keep me topped up on energy for the week.

During this third instalment I’ll explain the true purpose behind the challenge. Although we were using our bushcraft training to help us locate, gather, process and construct almost everything we needed to help us survive for a week in a wood, the aim of the game was to go beyond just scratching together an existence and delve deeper into improving our situation. Looking to the long term rather than just waiting to be rescued from our self-imposed imaginary survival situation. Once the basics for life had been achieved and food had been gathered we would be looking for ways to become more effective hunters and gatherers, ways of making our homes more comfortable, ways of making our lives more energy efficient. For someone with a lifelong interest in the subject and an ever expanding interest in traditional crafts and ancient life skills this was an exciting prospect…however, you can only hope to achieve so much in a week (my ‘to do’ list had me down as inventing the internet by the Friday and getting everyone else to do my hunting and gathering). This was going to be an exercise in testing bush crafts skill rather than survival.
By entering into the challenge, fully appreciating the true aim I was able to be constantly mindful of the need for certain resources in the very near future, even though other needs ranked higher at that particular moment. In previous posts I have explained that whilst a metal cooking pot turned out to be one of the most essential items of equipment you can have in a situation such as ours was, having only one pot in the kitchen proved to be fairly limiting. Every drop of water gathered needed to be boiled before drinking and survival stew was pretty much the only meal on the menu most days. So, while gathering my first billy of water from the stream, future resource number one was noted…clay. Our wild meat ration came in it’s natural packaging so again, future resources such as hide, sinews and bones were removed and squirreled away. Certain trees were added to the mental resources map if they looked useful for resin, carving wood or cordage. My foraged plants often had non edible parts that could be put to good use such as the easily weaved cattail leaves or the huge leaves of the burdock. If a resource was small enough to be gathered and bought home whilst looking for firewood and food, then it was. Soon my camp began to look like a hoarders paradise, an Aladdin’s cave of crap fit for the compost.

A cattail leaf food preparation mat made by Guy

My first priority, however, was to repay the wild meat loan. The deal here was that all participants started the challenge with a certain amount of wild meat (their only food for the week). The reasons for this marry up nicely with the aforementioned long term survival theme of the challenge and are explained in part 1. To retrospectively ‘earn’ the wild meat we had agreed to meet up on day three with a primitive projectile hunting weapon made by our own fair hands and using only the limited tools and equipment we carried along with any natural resources we could gather. Not only that, but it had to be capable of hitting a target from a suitably realistic hunting distance. We were fully aware that many other factors would come into play if we really did have to hunt wild game with our home made efforts (including a hefty fine or prison sentence in the UK) but given the nature of the challenge, we felt that making an effective weapon and successfully hitting the target would be a perfectly acceptable compromise.
So, I needed a projectile weapon capable of taking down a small deer. Not only that but I had nothing but a small knife and folding saw to make it with, limited time, lower energy levels and limited skill in successfully hitting targets with some of the more basic primitive weapon options. I’ve taken many a rabbit, squirrel or wild fowl with nothing more than a well thrown stick and a hasty follow up in the past but knew that to justify my fortuitous protein head start I’d need something with greater accuracy and packing more of a punch than just wellying a log through the woods. Knowing that a spear would require a lucky encounter or a long ambush and my atlatl throwing skills were about as predictable as the British weather I decided that the only realistic option for reliability and accuracy would be a bow and arrow.
 

Hazel rods stripped of their bark

I’ve made bows before but here, faced a few potential hurdles. Firstly, to make something with a fair bit of power, that could be used over and over in practice would require a seasoned stave of a suitable and readily available wood such as ash. To split out a stave and then remove enough wood to tiller the bow with only a small knife would not be impossible, but would take more time and energy than I was prepared to spare. I had made various ‘survival bows’ in the past too including a bamboo cane ‘bundle bow’ (bound bundle of canes, various lengths with all the bulk in the centre, tapering off towards the end of each limb). These proved to be extremely effective and quick to make…but I didn’t have any bamboo. By way of experimentation and the potential to look a real smart arse if it worked, I decided to use the bundle bow principle with a material I was familiar with, hazel rods. Hazel rods could be easily harvested with knife or saw and very quickly bound in the same fashion as a bamboo bundle bow.
Hazel rods bound with rawhide
 

The binding material needed to have good tensile strength to hold everything tightly in place while being stretched back and forth. Gaffa tape provides the perfect solution if you have your survival kit but the best option available to me was rawhide strips taken from my RPG blasted muntjac deer. As the hide was not in the best condition and I was keen to use parts of it for other projects later in the week, I took just enough for my needs, cut it into strips and left it soaking in a muddy puddle along with some hard wood ash from the fire to help loosen the hair. To be honest, the hair was already coming out by the time I began making my bow and if push came to shove, leaving the hair on wouldn’t have really made a lot of difference to the materials for this task.
The finished bundle bow with paracord bow string
 

As the bow was to be used in quite close cover, I decided on a short but hopefully powerful model. This was to be mistake number one (but I didn’t realise yet). A shorter bow would be less cumbersome to sneak around with in the woods and easier to use from dense cover. The theory was that I should be able to stalk closer to the deer in woodlands too meaning that the range of a longer bow wouldn’t be so important. A shorter bow also meant less lashings leaving more hide for other tasks. I cut several likely looking hazel rods, stripped the bark with the back of my knife and arranged them in size order. Bundling them together and lashing them tightly with the stretched and slightly damp rawhide, I gave the clumsy looking bow a tentative floor tiller. It creaked and complained a bit but felt extremely robust and springy! I re-positioned and straightened the rods, re-tightened the rawhide as best as I could and hoisted the bow up in the smoke and ambient heat from my campfire to dry out overnight. Now redundant, the paracord from my bow drill set looked like the best choice for a bow string so I tied a loop in one end and fixed it to one limb of the bundle bow ready for action.
Next, the arrow...
For the arrow, I used another thinner hazel rod cleaned of it’s bark and scraped to a more even diameter along it’s length. Any bends and crooked sections were heated over the fire, then held just beyond the straight until the wood cooled. Finally, I scraped the wooden shaft with a sharp flint edge and using my folding saw, carefully cut opposing notches at either end for the arrow head and string nock. The fletchings came from one wing of an unfortunate wood pigeon who had become lunch for a fox by the looks of things. I carefully trimmed these to sit tightly against the arrow shaft and bound them in place with sinew. I used back strap sinew taken from the muntjac deer as it needed very little preparation and was pretty much good to go after being dried, smoked and re-dampened.
 

Close up of pigeon wing fletchings tied with sinew
 

The scraped and dried muntjac back strap sinew
 
For the head I made a very simple flint point by basically smashing the hell out of a small nodule and sorting through the shards until I found something roughly around the right size and shape. This was coaxed into a slightly more recognisable arrow head with a few carefully placed taps from a pebble sized, slim hammer stone. Earlier in the day I had gathered some pine resin leaking from a bark scar and this was softened by the fire on a hot rock then mixed with finely powdered charcoal to add strength. Using this make shift hot melt glue I fixed the arrow head to the shaft, additionally binding the fixing with sinew then covering the whole caboodle with more resin. It must be said that after the frantic first couple of days building my temporary home in the woods and laying on all the services, the whole bow and arrow making episode felt like a huge and obvious transition from one stage to the next. In fact, lying on my home made mattress, surrounded by darkness and hooting owls, survival stew bubbling away, working next to the light of the fire I couldn’t remember a time when I felt more contented out in the woods.

 
The day of reckoning arrived! I’d put together a ‘range’ where we would all meet and now here we were brandishing several dangerous looking weapons including spears, dutch arrows, darts, throwing sticks and a couple of bows. After several days living wild in the woods we all looked (and smelt) like the theoretical animals we would be hunting. Having previously discounted spears and throwing sticks, in the right hands they were looking decidedly lethal and making a mess of my target board!

 
"Get to the chopperrrrr..."
 

My hazel bundle bow worked ok, hitting the target where it needed to but would’ve benefitted from a few evolutionary tweaks. I used green rods which meant that the bow wasn’t as ‘snappy’ as it could’ve been (but there’s a very fine line between gathering seasoned hazel rods and gathering kindling). Also, for next time I would increase the length of the bow for more draw weight and power as well as making the lightest arrow I could get away with. I know this because Dave (the android) had managed to rustle up an ash self-bow with some very thin hazel arrows and a thinner bow string made from inner paracord fibres. His super light arrows and springier bow combo was the Usain Bolt to my Bella Emberg. I mumbled some stuff about my heavier arrow causing more haemorrhaging but we all knew whose bow had bought home the bacon. A lesson learnt…don’t try to be a smart arse!


Dinner!
 
Lessons learnt, I sloped back off to my den in the woods to try my hand at a bit of wild pottery. The water level down at the stream was much lower than usual and as a result, a good amount of clean and useable clay was clearly visible and easily gathered. I hauled back as much as I could, also hunting down an old house brick from a foresters bonfire to use as a temper and a hefty hammer stone to crush it up with. I hadn’t had a great deal of success with previous pottery experiments but knew this was mostly to do with the fact that I often tried to squeeze these experiments into a ridiculously tight time schedule. You can’t rush something like primitive pottery, but here I had time to do a better job. So I worked the clay in my hands as much as possible, clearing out any obvious, potentially problematic pieces of debris as I went. With my clay cleaned as well as it could be in the circumstances I wrapped the burnt house brick up in a t shirt and bashed it to smithereens with the hammer stone until it was reduced to a fine red powder. Thinking of Dave and his stupid bow really helped here (only joking Dave).

Stream bank clay with burnt, crushed house brick temper


This was worked into the damp clay at a ratio that seemed about right. I pushed, pulled, prodded and pinched the ball into a sort of shallow bowl, dish kind of thing trying to get it as smooth and as even as possible even at this early stage. It was then hidden away to begin drying out in the driest part of my shelter, not too near the heat from the fire. As soon as the clay felt like it was firming up I took a sharp slither of stone and began scraping and smoothing the inside and out to an even thickness, filling any tiny cracks that appeared with the slurry I had created by scraping. The happier I became with the bowls progress, the more trepidation I felt about firing it. Previous firings had resulted in some disappointing but dramatic mini explosions.


I let the bowl dry some more then carefully etched a pattern around the rim as decoration (trying to be a smart arse again..). Now, feeling dry to the touch the bowl found a new, warmer home just inside the stacked log wall surrounding my fire place. I knew that despite feeling dry, it would only take a few drops of water to revert this bowl, dish thing into wet clay once more so firing was the only answer…but not too soon. My plan was to gradually move the bowl closer to the fire over a period of days, finally allowing the fire to claim it for a proper, fierce firing right in the heart of the coals and flames on the final day. In fact, I went home with the bowl dry but not yet fired. The firing happened whilst running a course a short while later (I think we were heating up rocks for an underground hangi oven or something). As you can see, despite a few authentic looking cracks, none of them life threatening, it survived the process! There’s certainly room for improvement but it’s a good step forward.

 
As the days ticked on we all found time to work on different crafts in addition to feeding ourselves, staying warm and sheltered. We whittled pot hangers, spoons and other treen, wove brambles into baskets and leaves into food preparation mats. Myself and Guy had some buckskin pouches to put together  (admittedly these were made using our own previously prepared buckskin we’d bought along but at least we had the spare time).

Various crafted items: bramble stem foraging basket, clay bowls, carved spoons, venison jerky, a roughed out kuksa cup and buckskin pouch
 
Guys buckskin pouch with bone toggles

Once we’d fought through the first couple of days and established a routine we seemed to have quite a bit of spare time, however I’m under no illusion that, for the purposes of this exercise I had chosen a location with plenty of accessible wild foods growing nearby. Also, we were just entering a time of year when, not only was it still pretty warm but in wild food terms it was certainly a time of plenty. Additionally, we were all in good health and only there for a week so this personal experiment cannot be considered a realistic example of how bushcraft training can help a modern human successfully revert back to hunter gatherer status. Everything is relative though and I still maintain that without the skills we had spent years honing, our week living wild would’ve been over in the first 24 hours …. and even if we had managed to stay alive, we certainly wouldn’t have been as comfortable!


If you fancy trying your hand at the Hunter Gatherer Challenge in October 2014, get in touch to discuss pre-course preparation or visit the website page here
We're also running a Winter Bushcraft Challenge in February which is designed as a perfect warm up (probably not the best choice of phrase) for those who have the intention of attending the Hunter Gatherer later in the year.
Thanks for reading. Hope you enjoyed it!


Sunday, 24 November 2013

If spoons could talk...


Just looking at some of the whittled spoons I have hanging around in the kitchen whilst waiting for the toast to pop up and the kettle to boil this morning. Every one of them has a story to tell – many are the product of heading out to the woods, sometimes with no agenda other than to go home with a new creation. A spoon is clearly a functional item, as is a basket, bowl or cup, a bark container but carving a spoon goes way beyond the need for a tool to shovel food into face. The materials have been harvested paying close attention to the type of wood and their differing properties, the condition of the timber, maybe even the time of year. The finished piece bears the ever-lasting marks of your hard work, perhaps giving others an indication of your craftsmanship but more importantly on a personal level, serving as a physical reminder of where you were, who you were with, what you were thinking as you carved. Such an investment of time and labour imprints these memories deep within the wood grain itself, far better than any photograph. As time passes, a unique patina develops through use telling a story all of it’s own… 


Here's a handful of favourites, starting at the bottom with the crook knife (don't try and eat your cereal with that one..) and turning clockwise through the photograph:


1.     A Ben Orford small standard crook knife with a hybrid handle which lives in the lid pocket of my daysack. Excellent for spoon hollowing and thanks to the extended, curving handle great for larger projects too. You need this tool in your life!


2.    Oak spoon – carved on a winters day whilst being not particularly successful at hunting rabbits on the Sussex estate where my brother in law works as a game keeper. The green oak was easy to carve and showed the characteristic oak medullary rays in the spoon bowl before greying through use. This one is probably about thirteen years old.

3.    Little Cedar spoon – carved whilst sitting next to a campfire in Morocco around ten years ago, surrounded by sand dunes and stars. The bowl is shallow because I hadn’t packed a crook knife so used the curved tip of my pen knife instead. I increased the bowl depth slightly through burning using a glowing ember from the fire, then sanded it smooth with sand grains and cloth.

4.    Small Ash spoon – carved as a demonstration several years ago, this little spoon became the camp coffee spoon, hence the dark colouration in the bowl. I lost it after a course and suspected a shady character who had been admiring it all week, of it’s theft. Six months later I found it again hidden under the leaves where the washing up bowl is often emptied and had to forgive the formerly accused and entirely innocent person quietly to myself.

5.    Extremely curvy birch spoon – Again, another demonstration piece however, this one started life as a dramatic failure. Whilst demonstrating the benefits of a ‘stop cut’, I didn’t stop at all and ended up shearing off the whole of one side of the bowl. I can still hear the laughter (not mine obviously..)! After this shameful episode I persevered and ended up carving a smaller spoon using the extra bit I normally leave on either end of a spoon blank ‘just in case’. So the shape is a little strange but it has it’s own unique elegance and is probably perfected suited to some sort of role somewhere….just need to find it.

6.    Ash spoon, also from the lid pocket of my daysack – the last remaining (not finished) member of a set of four similar spoons. The other three were slowly seasoning in a bin bag when they were mistakenly included with the rubbish and chucked out! A warning to fellow forgetful folk…

7.    A beech eating spoon – this is my current eating spoon. The bend in the handle isn’t intentional, instead the result of warping as the wood seasoned. As it happens it curls round my hand perfectly! The other half of the split beech limb was carved into a spatula and has also warped in the same way to make a perfect matching set.

8.    Sweet chestnut spoon – made during a bushcraft course attended after leaving the army quite some time ago. Made some good friends and learnt some fantastic skills. The lead instructor was a quietly understated but extremely skilled Swedish chap. He had a good look at the spoon (my first ‘proper’ hand-made wooden spoon) and told me to go away and make another, but this time just using an axe. I think it was his way of telling me I’d passed that particular test.

9.    Black oak spoon – carved in Portugal from seasoned wood about eight years back. Extremely hard work, my thumbs never forgave me! This served as my eating spoon for a while and could probably have doubled as a club for knocking out tiny assailants.
Make some memories - happy carving! 


Monday, 18 November 2013

Packing your kit for winter:


With the winter of 2013/14 apparently about to be the worst since 1947, we're set for some seriously chilly weather. Despite the seasonal media doom mongering, it's no revelation that winter is cold in the UK! This should most definitely not mean putting your outdoor kit into storage until spring - the colder months are some of the best times to get outside. You'll probably have the place to yourself for starters! At first glance, the stark landscape and sleepy, quiet woodlands suggest that there’s not much going on and that the best place to be is snug and warm indoors, but it’s well worth pulling on your thicker socks and silly hat with the ear flaps and going to take a look for yourself.  The winter snows bring their own set of seasonal bonus’s to the bushcraft enthusiast; greater opportunities for tracking is just one. Not only is it easier to pick up sign but it’s far easier to interpret and follow a track from start to finish. This is helpful for confirming certain theories that are otherwise difficult to interpret correctly at other times of the year. This information, once confirmed can be of great use when using knowledge of a certain animal’s behaviour to fill in missing gaps along a trail at other times of year.

If you have set out to learn bushcraft skills as a form of insurance should something ever go wrong then to gauge progress, occasionally it helps to test yourself. Skills that come easy in the summer will be that much harder in the winter months as the harsh weather and difficulty in identifying resources throw up all sorts of additional limiting factors. Fire lighting, tree and plant identification, navigation are all outdoor skills that require a real in depth understanding which is fully tested to the limit in the winter. By practicing and mastering important skills such as these in the winter time your confidence will be increased dramatically at other times of the year. Train hard, fight easy as they say...

Above all, waking up in a snowy forest is the stuff of fairy tales. If properly kitted out and equipped with sound knowledge of the winter environment then to a certain degree, snow can be your friend offering insulation, building materials and even drinking water. Any light from the moon is enhanced greatly on the surface of a snow covered woodland floor allowing some fantastic night time wildlife encounters that would otherwise be missed.  But cold, wet conditions can rapidly increase the speed at which things go wrong if caught out unprepared. Practicing skills that could save yours or others lives is important but you must have a back up plan when the cold weather hits. Before venturing out it’s a good idea to spend a bit of time preparing to ensure that you could take care of your own survival should the unexpected happen and you find yourself stranded between A and B at the mercy of winter at it’s most wintry. 

Keeping things simple is always important and initially it makes sense to settle on a packing system that works pretty much all year round, only needing a bit of tweak for extreme weather conditions or different environments. When tweaking your packing system for a trip in winter, give some thought to whether or not your kit would realistically keep you sheltered, warm, hydrated and fed if you had to spend an unexpected night outdoors. Additionally, could it enable you to call for help, guide in rescuers or even self rescue before things got out of hand?  In light of the annual stories of unfortunate travellers stranded overnight on snowy motorways, it seems that any winter journey could result in a chilly, potentially life threatening experience if things don’t go to plan. It pays to be prepared and a well thought out, fully packed winter survival bag could serve you just as well kept in the boot of your vehicle as it could out on the hill. Additionally, if the zombie apocalypse begins while you’re out doing the shopping you’ll be laughing all the way to the fortified survivors compound.

Here’s a suggested winter packing system for a day out walking or an emergency bag to be kept in the back of the car. The rucksack shown has a 45 litre capacity which should really be seen as the minimum size for a winter day sack:


Lid / outside pocket:  Items you might need in a hurry:
 
Keep the following items in the lid pocket or a side pocket so they’ll be close to hand without having to tip the contents of your bag out all over the snow...


1.  Good head torch with new batteries, powerful beam and preferably some additional features (the Alpkit gamma shown has all sorts of flashing, different coloured and different strength beams).
 
2.  Tough, flexible, waterproof pouch containing phone as well as a spare battery or reliable, portable charging system. My waterproof pouch has a lanyard so it can be attached to my rucksack. I also carry a second ‘cheapy’ phone that uses a different network to double my chances in areas with poor signal.
 
3.  Compass, whistle, notebook, pencil and waterproofed map (map not shown here). Forward thinking mountain navigators also have a spare map, sometimes of a larger scale hidden away in the main body of their pack. Maps can suddenly become tiny un-piloted para gliders without warning on windy days...
 
4.  Back up mittens: In winter time, especially out on the hill if your hands are frozen you’ll get into serious difficulty. Putting up shelter, lighting a gas stove, even using a map and compass becomes virtually impossible with numb hands. In the event that your primary pair of gloves becomes ineffective after a good soaking, or even whipped out of your hands by the wind, you won’t want to faff around too long looking for replacements. Keep a warm, weather-proof but easily packable pair sealed in a small drybag (Buffalo make excellent pertex and pile mitts for this purpose) in the hood pocket. Basically somewhere you can reach with your teeth if needs be!
 
5.  Toilet kit: the last third of a toilet roll and some anti-bacterial hand gel in a ziploc bag is a better option than looking for soft leaves on a hill side in winter!
 
6.  High energy snacks (not shown, or eaten. Probably eaten)
 
Main body of the rucksack - top layer:  Shelter and warmth


1.     If not already worn you’ll want your waterproof jacket right at the top ready to don if the heavens open. In this day and age, your main jacket should really be made from a waterproof and breathable fabric with taped seams, weather-proof closures, a good hood and pockets. I hate wearing too much when on the move so avoid wearing mine whenever possible, instead opting for a lightweight windproof hooded top and thermal shirt underneath. If you feel the same then you must ensure that your winter walking top is at least windproof, preferably showerproof. Constantly battling the wind chill will use valuable energy and mean that you’ll rapidly cool to the point of shivering whenever you stop moving. A windproof top keeps the wind-chill at bay and traps much of your own generated body-heat next your body where it belongs. There are loads of windproof, quick drying, lightweight and highly breathable fabrics out there that don’t feel like you’re wearing a bin bag. Montane, Rab, Paramo and Buffalo all make good lightweight windproof tops.

2.    I also keep a warm hat in the pocket of my waterproof jacket and make sure the jacket is arranged with that pocket being the first thing I see when I open my rucksack. It’s amazing how much warmer you feel if you pop on a hat when you stop for a brew or to check the map. Almost like putting on another layer! A snood, buff or whatever the latest strange name for a warm neck covering is, should also be kept here for the same reason.

If you carry them, waterproof trousers should be stowed here too.

3.    Keep a mid-weight windproof and warm top near the top of your bag, just under your waterproof jacket. I favour a gillet if I’m on the move or working hard as it’s less restrictive on the arms; synthetic fill insulated job when out in the hills and dense wool if mucking about in the woods. Top tip; if your warm top has a full length zip then keep it zipped around a third of the way up and pull it on over your head. Trying to get the two halves of a zipper to connect with cold fingers or big gloves on when the wind is picking up is not easy. Also, when removing clothing such as jackets to add another warm layer underneath, keeping the bottom section of the zip, zipped means it can drop down out of the way still fastened around your knees but not be completely free to be suddenly blown awaaaaay across the hills.

Also shown here, sunglasses are handy for protecting your eyes from the glare of the snow and more importantly, will magically transform a boring looking rambler into a polar explorer or adventure racer!

4.    In the winter, especially if walking primarily in exposed areas it makes sense to carry a lightweight shelter of some sort. If stopping for a rest it can be quickly set up to provide protection for you or a small group and if stranded out overnight it could be a lifesaver. When I’m in the woods I take a lightweight, waterproof tarp (currently an Alpkit rig 7 – fantastic) with guy-lines fitted so that I can set up some overhead cover to work under in the rain. When out on the hill an emergency ‘bothy’ bag would be your best bet. These can easily be whipped out and used to create a sheltered place for lunch. My rig 7 tarp is about the same size as a two person bothy bag when all squished up, basically very small indeed. If you carry walking poles a tarp can even be set up like a small tent out in the open but you’ll need some origami training first.

5.    If you have an old foam sleeping mat then it’s a good idea to cut out a section as long as the height of your rucksack and twice the width. Fold it in half along it’s length and slip it down inside the main body of your rucksack to sit against the existing back padding. This can be pulled out to sit on whenever you stop for a rest or in an unplanned overnight emergency, used to provide vital insulation between your body and the ground. Although smaller than a full size mat, you can at least provide protection for your torso with your empty rucksack and other kit providing some ground insulation for your legs. It also gives a bit more padding to the back of your rucksack when packed!
 
Middle layer:  Food, water, stove, essential kit


1.    Drinking system:    I’ve had problems with hydration systems in the winter (frozen hoses) so carry my water in a hard, plastic 1 litre bottle with a wide mouth. Hunt around for a bottle that will fit neatly inside a large metal mug so that these two bed fellows can stay permanently locked together in your kit. A metal mug can be used to cook in, melt ice or boil wild water to make it safe to drink. Keep your water bottle/mug combo in a pouch along with a spoon, a metal lid for the cup (to speed up the heating process), a cloth water filter bag and some water sterilization tablets or similar water purification device.

2.    One litre of drinking water isn’t really enough so carry a second water container. In the winter months this may as well be a small stainless steel flask filled with a hot, sweet brew! Looking for a good place to keep your gaffa tape? Wrap a load around your flask and water bottle.

3.    Food:    Winter walking grub needs to be highly calorific offering both quick and slow releases of energy. Time to raid the Christmas selection packs! If heading out for the day then choose food that matches this criteria but also concentrate on foods that don’t necessarily need to be cooked. Obviously heating your food in the winter is recommended but if stove fuel is low, it’s good to know that your only available meal option doesn’t involve crunching your way through cold powdered potato sachets (been there...). Also, take more than you need for the day – pack for an unexpected overnight camp out. If you’re packing a rucksack for a potential emergency then 24 hours of highly calorific food needn’t take up that much room if you spend time shopping for the best options. If you’re annoyingly organised you can separate meals into different ziploc bags with a separate one for brew kit. Incidentally, replace milk or milk powder for the sweet, condensed stuff in a squeezy tube which can also be guzzled in an emergency and tastes yum in a coffee.

4.    Cooking pot, stove and fuel:    If you won’t be able to light a cooking fire (open terrain or not permitted) then a cooking stove is essential. Ideally, carry a small but effective stove that will fit inside your main cooking pot for protection. To stop everything rattling around your stove should also be kept in a cloth bag or wrapped in a tea towel within the cooking pot, along with a lighter and spare fuel if it fits. As your pot is likely to be dirty on the outside this should be kept in a dry bag of some sort leaving room for a flexible or folding windshield to speed up cooking times and save fuel. A word of warning though, always make sure that gas stoves which have an integral fuel compartment don’t get too hot due to your reflective windshield being too close and surrounding the stove completely, or you could end up wearing your dinner as a hat. Leave the windshield open on the leeward side to keep the fuel compartment cool. Never cook inside a tent without proper ventilation due to the risks of carbon monoxide poisoning and it goes without saying that in the event of a vehicle breakdown or becoming stranded overnight in the snow, cooking inside or even near a vehicle is an extremely stupid thing to do!

Obviously there’s a limit to how much stove fuel can be carried so if carrying extra food, and travelling somewhere where lighting a fire may not be possible, it makes sense to also carry an emergency cooking source and for this you can’t go far wrong with a small packet of solid fuel tablets. A small pot support can then be improvised with sticks or rocks. There are also a number of ingenious little portable wood burners which maximise the effectiveness of natural fuel sources (such as dry bark, pine cones etc), leave nothing but ash, are much safer than a full on campfire, weigh virtually nothing and take up little more room than a birthday card when packed. Worth adding to your stove bag for sure. 

5.    Bits and bobs bag:    This bag contains a number of essential items which may be needed during the day as well as spare back up kit to some of your most important gear. It’s also a stand alone survival kit if needs be. A detailed breakdown of mine can be found here.

6.    Bushcraft tools – belt knife and folding saw:    With a good multi tool in your bits and bobs bag, cutting tools aren’t really essential kit to the average walker. However, to those who intend to go off the beaten track or have taken time to learn how natures resources can be utilised to your advantage, good cutting tools are definitely not leave at home items. After all, how the hell do you expect to whittle a wooden spoon without them? Don’t forget that if your rucksack is to be carried in a vehicle ‘just in case’ then the carrying of fixed bladed or folding lock knives needs to have a good explanation if you find yourself being stopped by the police for any reason. Use your common sense here. A machete strapped to the outside of a rucksack on the rear parcel shelf is asking for trouble.

7.    A first aid kit should always be carried but especially if using sharp cutting tools. Some of the items from larger kits (such as slings, folding splints etc) can be improvised so unless you’re intentionally heading off into the wilderness for an extended period your first aid kit need only consist of stuff that might actually be needed. My personal kit has plasters, blister plasters, steri- strips, antiseptic wipes, painkillers, zinc oxide tape, latex gloves, tweezers, sterile wound dressings, antiseptic cream, a crepe bandage and a small tin of vaseline (good for cracked lips, rubbing toes and chafing). Because I often use sharp cutting tools whilst a bit further away from medical assistance, I also carry a large military wound dressing and a small packet of haemostatic clotting agent. There's normally room for this mini kit inside my 'bits and bobs' bag.
 
Bottom layer:    non essential emergency gear and spare clothing:
 
 
1.    Before deciding what emergency gear to pack in the event of becoming stranded outside all night, I can thoroughly recommend attempting exactly that as part of a safe, supported and controlled experiment. I have on several occasions and the bitter experience gained means that the kit I carry now has just the right balance between real performance and small pack size. Rather than increasing my slim chances of survival by just a tiny amount, the comparatively small increase in weight and volume will ensure that I see the next morning with relative ease. A huge leap forward in survival kit technology is the emergency ‘reflexcell’ gear made by Blizzard. Blankets, bags and even jackets are all available. These are made from layers of reflective foil with compartments sandwiched between the innermost and outer layers designed to trap your warm air. I carry the Blizzard sleeping bag which comes vacuum packed to the size of a video cassette but has the warmth rating of a medium weight sleeping bag! Peace of mind if trapped outside in cold conditions overnight.
 
2.    Super warm top:    Again, you should be looking for maximum performance with minimum weight and bulk here. Down or high performance synthetic fill jackets fit the bill perfectly squishing down to almost nothing but keeping you extremely warm when worn. Your super warm top should be kept in it’s own waterproof brightly coloured and labelled bag so it can be easily found down there in the depths of your rucksack, only seeing the light of day in an emergency, during an extended stop or at much colder times of the day. If stuck out all night it’ll really turn the tables in your favour when worn inside a blizzard bag. Such an extreme garment should have a hood for maximum warmth and if it’s sole purpose is as a last resort layer then buy a size bigger than usual to allow for extra layers underneath.
 
3,4 & 5.    Lastly, right at the very bottom of your rucksack is a mysterious waterproof bag containing a full change of clothing, only to be opened in a dire emergency. A full change of clothing sounds like a bulky and heavy over indulgence for a day bag and not everyone goes to such lengths. In fact this part of my kit is only included if the weather is absolutely horrendous, if I’m heading well off the beaten track or if I’m planning on staying out for a couple of days. However, when you’re out all day at the mercy of the elements, even expensive waterproof clothing has been known to give up the ghost and let moisture in. You may even slip into a cold river and get a soaking! Despite sounding like a bulky package, a full change of clothes can be trimmed down to the bare essentials. A full set of wool thermals, spare warm socks, gloves, a balaclava, and a windproof suit made from para-silk or pertex squashes down to a surprisingly small package and will provide a warm, dry and protective layer next to the skin. With your super warm jacket on top you’ll be back in the game in no time.
 
For walking on steep, snow covered ground you’ll also need various specialist equipment such as crampons, an ice axe, snow shovel and avalanche probe but really, anyone needing to carry this kit should book themselves onto a winter mountaineering skills course first as the knowledge gained here WILL save your life. Check out Rob's site for just such a course. Rob’s an absolute diamond of a bloke – you’ll be in safe hands!
 
Hopefully the above advice will be of use to you. Enjoy the season!


Saturday, 2 November 2013

Building A Long Term Shelter part 2:


The Building...


Welcome back! The story so far…
A decision to build an equipment storage shed at our woodland site in Wiltshire very quickly morphed into a quest to build a long term shelter using minimal tools (mainly what we might carry as part of our standard kit) and maximum knowledge of the building resources growing naturally in the woods. A proper hinged, plank door, a la quaint hobbit cottage became the first construction challenge but proved to be a superb exercise in what can be achieved with only natural materials and a fair slice of ‘know how’.
 
Shelter building, be it small survival bivouac or palatial log cabin, always requires a sound plan before the work starts and that’s exactly where we were at on a chilly, wintery morning among the bare, hazel coppice and towering, skeletal oak trees. Resisting the urge to be too ambitious by embarking on a full Celtic roundhouse or Anglo Saxon long house we settled on a small, rectangular floor plan with the doorway at one end, just big enough for one hypothetical person to live in comfortably through the winter months. This would mean allowing enough room to fit a raised bed, make a fire place and still have enough room inside to work, cook and store kit in bad weather. The roof would be a simple double pitched affair continuing around the back of the house in an arc at roughly the same pitch (around 50 degrees). The initial planning brain storm also bought to light several problems that typically reduce the effectiveness and life expectancy of survival shelters. We were determined to provide our own answers to these problems but ultimately, only time will tell if our efforts have worked.
 
Firstly, we wanted the house to be able to ‘breathe’. Our plan was to make a fully enclosed shelter that would be capable of keeping out the worst weather but in doing so, we were all too aware that such an enclosed design could also keep moisture in, especially as the house wouldn’t really be inhabited and therefore wouldn’t have a constant heat source chugging away. With a cold, damp atmosphere inside, our shelter structure would rot and collapse very quickly. Even with our hypothetical inhabitant keeping the home fires burning day and night creating a dry atmosphere in side, the point where the thatched roof met the ground would always be damp and if the strength and integrity of our structure depended entirely on the rafters (as many survival shelters do) then it stood to reason that it’s life span could only ever last as long as it takes a constantly sopping hazel rafter, half buried in earth and leaves to rot through. Probably not very long!
The shelter footprint - level ground with building materials on hand, no dangerous trees overhead but some natural shelter from the surrounding hazel coppice
 
The solution came in several parts. We would first build a strong, internal low wall of hazel rods woven around several oak posts on which many of the rafters would rest (therefore, never being in contact with the damp ground).  This woven, rectangular frame would provide a sturdy base to start building from, but it would have to be pretty solid! The secret to the wall’s strength lay in a handful of quartered ‘bone oak’ posts, split from a large log using a small axe and the maul and hazel wedges made on site. Bone oak, having gone through a chemical change as it seasons, is absolutely rock hard and virtually rot proof when compared to the other timber in our woods. These long posts would be carved to a point and hammered several feet into the earth to form the corner posts and a couple of intermediate posts to weave between. This seemed like a fantastic idea but by the end of a very long day of splitting, hammering, shouting and swearing, we wished we hadn’t thought of it. After the bone oak splitting saga we decided that any other posts needing to be sunk into the ground, should be made from readily available and easily workable hazel. The below ground parts would be charred in the fire first to help preserve them.
Splitting bony oak to make the main posts
 
Cutting simple joints for the wall plate
 

Charring the ends of any hazel posts due to be driven into the ground
 
An almost endless amount of flexible hazel rods were then cut and woven in and out of the upright posts to make a surprisingly strong hurdle wall starting on one side of the door frame and eventually coming all the way round to meet the opposing door post. None of these hazel rods were split, instead kept in the round for speed and ease. A strong, upright ‘king post’ held up the main, central ridge pole towards the back of the shelter wall, reinforced by two further posts sloping away and through the woven, wattle walls. At the front of our house, two strong posts formed a backwards sloping ‘A’ frame, interlocking securely around the ridge pole where they met at the top.

Weaving walls from hazel rods


The main rafters in place, bound with hazel witheys

 
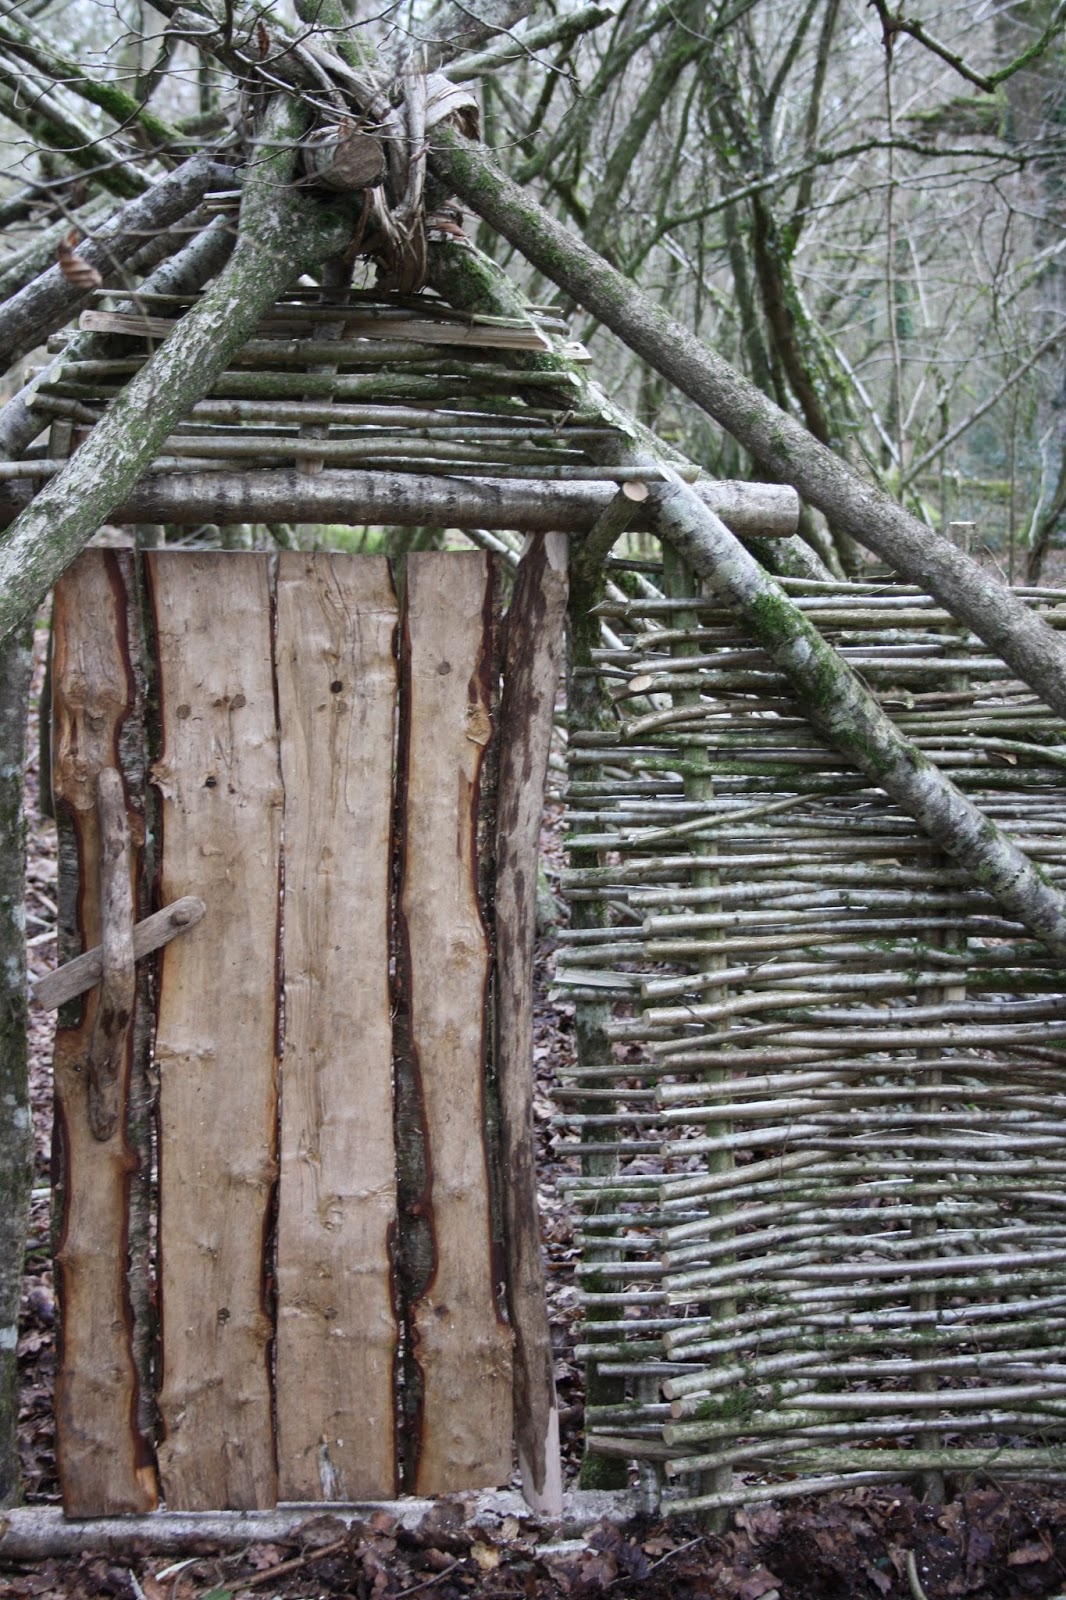
The door frame is fitted to the structure and birch plank door is hung and swinging
 

A ‘wall plate’ (wooden platform on which the roof rafters sit) was fitted to the top of our woven walls by way of some simple but nifty joints to minimize any movement and wherever two timbers lay against or crossed over one another, they were lashed securely in place with hazel withies. Our rafters were selected so as to have a ‘Y’ fork that, when turned upside down could hook over the wall plate and hold the rafter in position. For added stability, every few feet a rafter extended down and into the ground (charred first of course).  Where the rafters crossed over the ridge pole at the apex, a twin band of flexible hazel rods wove in and out between them to hold them securely in position. The little woodland house was beginning to take shape!
Rafters fitted, held in place with their own natural 'birds mouth' forked ends and a twin band of hazel along the ridge


Hazel wattle continues up and over the door frame, tying everything in nice and tight

Our building plan had highlighted the need for the shelter to be kept fairly small and therefore easy to heat with a small open fire inside. Previous research had shown that similar ancient dwellings were often built without chimneys, instead allowing the central fire to form a ‘smoke ceiling’ above head height which would slowly permeate through the roof thatch. This helped preserve the roof timbers and kill off any resident bugs overhead. However, these structures were built to house an entire family and therefore, much larger with higher roofs. Our humble woodland bedsit would be more like a lung bursting smokehouse if we followed the same principle so we came up with the idea of a ‘dormer window’ style opening near the top of the roof on the opposing side to the prevailing wind. With our shelter design being so completely enclosed, this opening would also let in some light. The combined window and chimney idea became affectionately known as the ‘wimney’.
 

The wimney frame work woven and bound in place
 
Wimney opening with thatch border and roof nearly ready for thatch
 
Now, the super observant readers amongst you will notice a slight continuity error with the seasonal backgrounds to the following accompanying images. As with most exciting projects, life and work seemed to get in the way and it wasn’t until the summer that we were able to finish the next part of the build. The increasingly warm weather could have created a false sense of security but looking further ahead to winter we decided to address our predicted damp problem by ensuring the roof thatch stopped short of the ground leaving a gap for ventilation under the eaves. In theory, this should allow the whole building to breathe and dry out once the rain stopped. When we initially hatched our building plans we all imagined a beautifully thatched roof straight off the pages of an Asterix the Gaul cartoon however, very quickly we realised that total coverage of our roof would require an awful lot of prime quality thatching materials to achieve the quaint cottage look. Bracken is plentiful in our woods and the long stems looked like they might provide a good alternative to thatching reed but for such a shallow roof pitch we would need a thatch depth of at least a foot, possibly more. Using only bracken stems that would be a mammoth task. Laziness and guilt (where would all the ticks live if we cleared the woods completely of bracken…probably on me) kicked in and we concluded that the only realistic thatching option would be to scoop up every leaf, twig, clump of moss and slab of bark in the near vicinity and dump it on the roof.
 
 
Brash wood matrix applied ready for the thatch and giant thatch retaining sausage fixed in position
 

Back view of the shelter with thatch retainer shown leaving a suitable gap under the eaves


Usually, when using forest floor debris to thatch a shelter the huge volume of materials is gradually piled against the shelter from ground level upwards. In order to achieve our ventilation gap between roof and ground we would need to prevent the leaf mulch and jumbled medley of materials from just slipping right off the ends of the rafters and so the ‘giant thatch retaining sausage’ was born. A big, long bundle of twiggy brash wood, lashed to the end of each rafter about a foot up from the ground, forming a continuous buffer line running around the lowest point of the shelter roof and sweeping up and over the porch (yes, we built a porch too!). The thatching materials would sit against this buffer creating the desired depth of a foot but still leaving our all-important ventilation gap.  Where required, horizontal hazel poles lay against the rafters to provide a sound base, followed by a good layer of spiky brash wood to close up any gaps and give a good ‘sticky’ surface (excuse the pun, but it is rather good…) for the leaf mulch layer to adhere to.  

Leaf thatch being applied


Wimney opening still visible in the thick layer of thatch


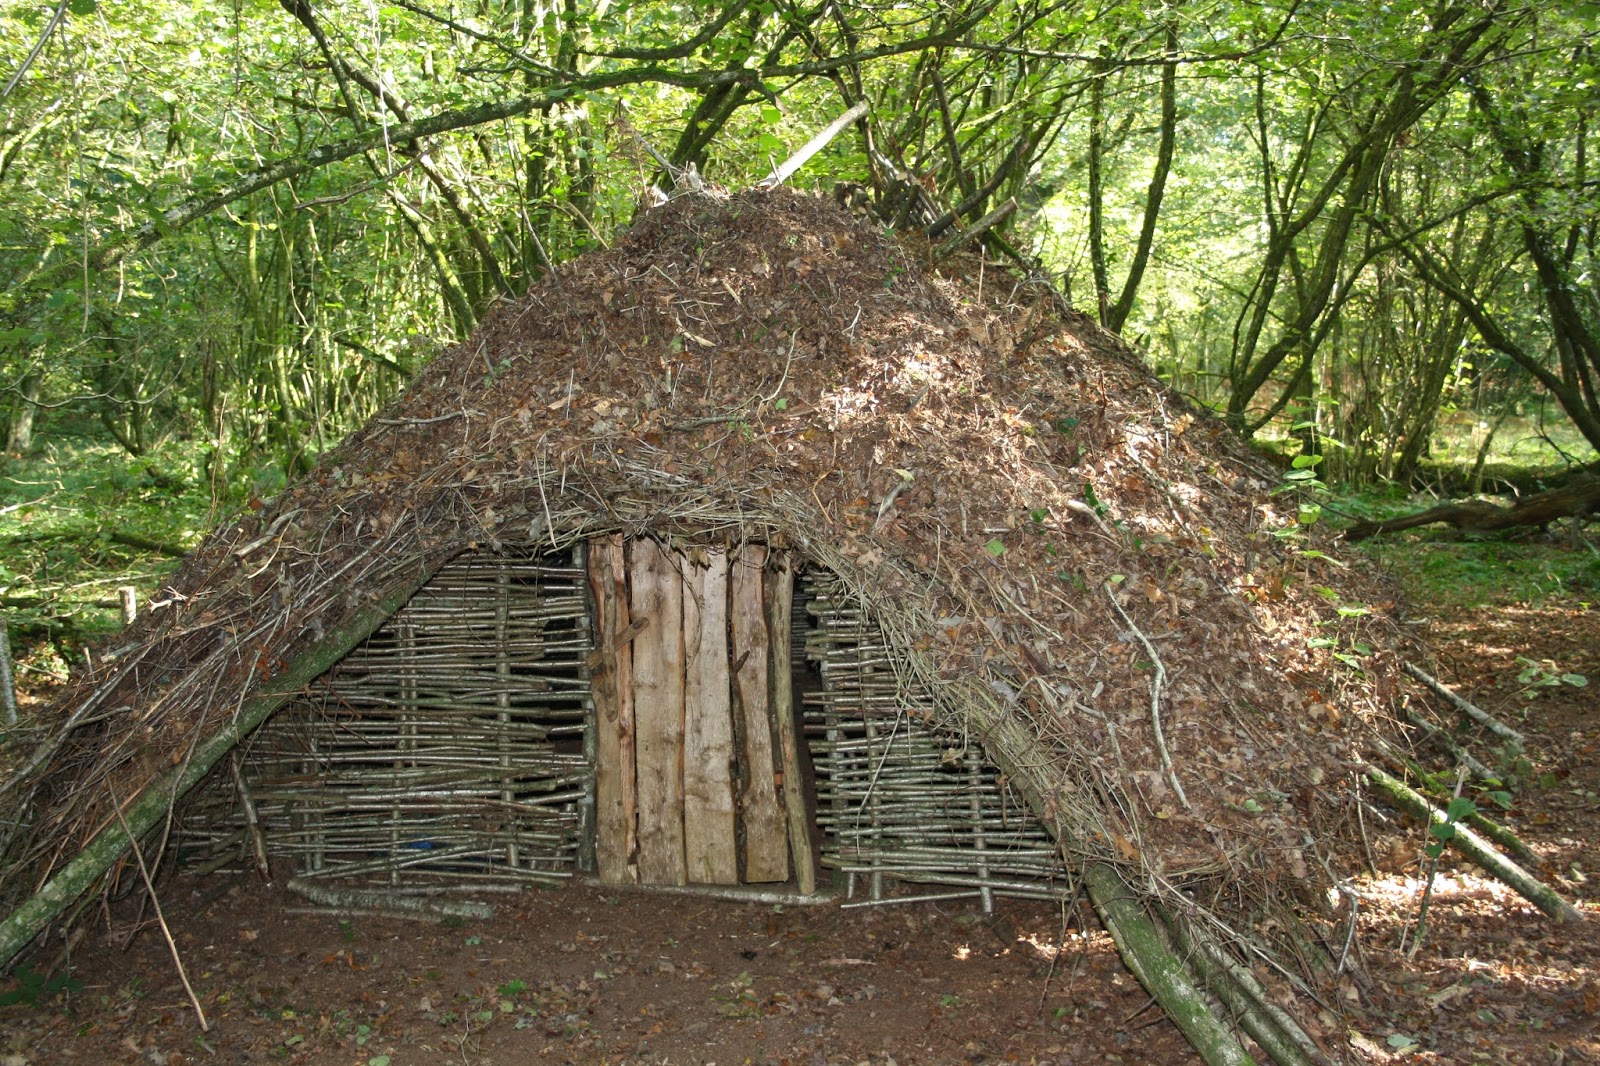
Shelter roof with a good covering of leaf thatch for the summer

The giant thatch retaining sausage (GTRS for short) did a great job of keeping the first insulating layer of leaves exactly where we wanted them and before long our little hut in the woods began to blend in beautifully with it’s surroundings. Just down the track we were fortunate to have a huge swathe of tall, mature bracken. We made the most of this seasonal resource by taking just enough to give a good coverage to our roof, leaving the rest for the ticks. When harvesting bracken it’s important to cut the stems rather than pull at them. For starters, the roots aren’t usually that deep and if the plant is removed roots and all, there’ll be no bracken for the following year. Also, the stems have a sharp ridge that will give you the mother of all paper cuts as you tug them up. Instead, gather together a good bunch and using a long bladed knife, carefully slice through the stems with a sloping angle at ground level. The resulting long, pointed stems we found to be ideal for poking through the leaf mulch and the brash wood thatch layers before folding the bushier fronds over to lay against the roof. By starting at the bottom of the roof and working upwards towards the ridge, each course of fronds overlaid the previous for maximum rain shedding, with the added bonus of ‘pinning’ the mulch and brash layers together like a thatching spar.

Late summer and the bracken layer is added increasing the volume of the roof thatch

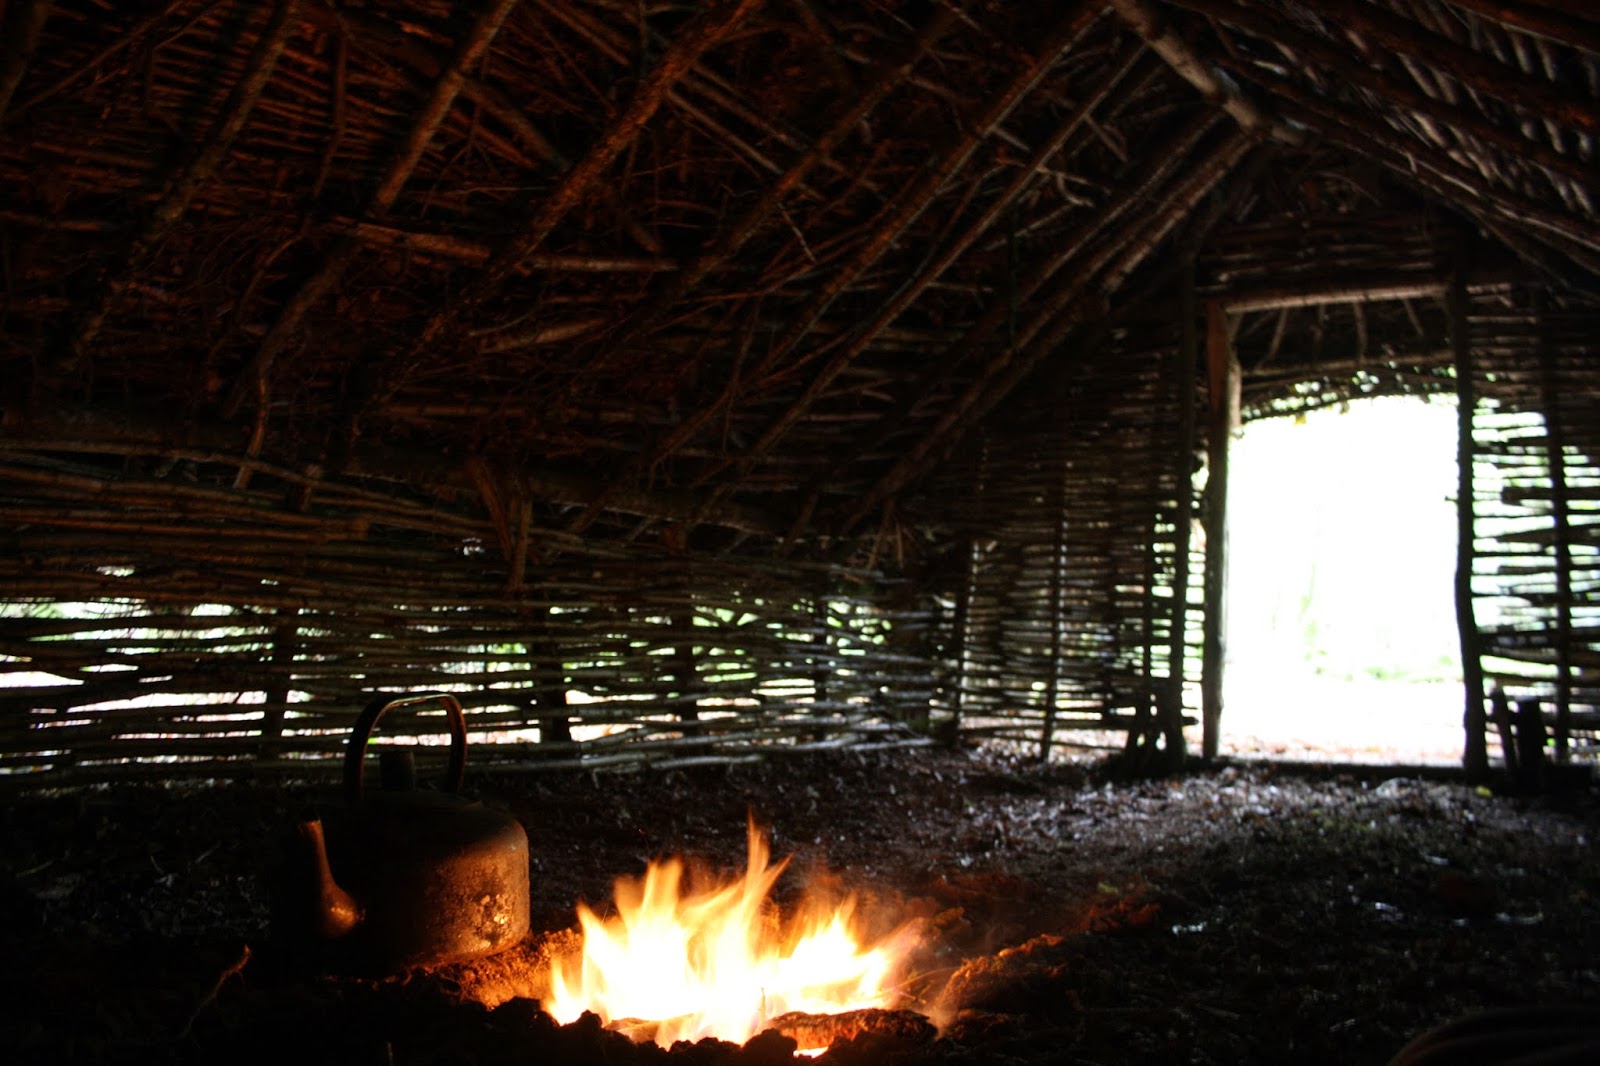
A small fire is lit inside to dry the shelter out and drive away any insects (and to get the kettle on...obviously)


I always judge the strength of a shelter by whether it’ll take the weight of a fully grown man standing on the roof. To position the top few courses of bracken thatch this is exactly what it had to support and I’m very relieved to say that despite me owning shares in both Ginster’s and Cadbury’s, the roof survived intact. As summer gave way to autumn a familiar resource became available once again. A top layer of newly fallen leaves was added to the now wilting bracken fronds giving the shelter more weather protection and also some seasonal camouflage. In preparation for winter I decided to add some ‘daub’ to the woven hazel walls, something I had seen demonstrated before in re-constructed Anglo Saxon villages. Firstly, I turned over a patch of earth outside the shelter, then added water and old bracken stems to bind the mix. One ingredient was missing but without a horse and no other method of producing dung (not one I fancied using anyway) mud and bracken would have to do. Having mixed a fair few buckets of lime mortar and plaster while renovating my old cottage, I knew consistency would be all important if the earthy sludge was to stick to the wall. Using the bushcrafters most important tool (my hands) I squelched and smoothed the daub between the hazel wattle until the whole façade was covered and any gaps were filled. Despite being a pretty messy job I found this to be possibly the most gratifying part of the whole build, similar in some ways to applying and then buffing a final coat of wax polish on an item of hand built furniture. The concept of taking such a readily available resource and using it so effectively to weatherproof a shelter wall really appeals to me and I’m sure it won’t be the last time I experiment with it as a building material.
Applying a caulk of mud and bracken stems to the hazel wattle walls

Finished front wall and the shelter really begins to look like a weatherproof dwelling

Inside view, looking out. The hinging post and socket can be clearly seen as well as the benefit of having a good porch!


As mentioned earlier in the article, only time will tell whether our efforts have created a weatherproof and long lasting shelter. Throughout the build and especially now it’s finished, I’m drawn back to the woodland house whenever I pass by to see how it’s holding up. During it's first winter the house had to endure high winds and a long period of wet weather followed by heavy snow. I expected to have to carry out some hasty repairs but amazingly every part remained intact and secure. The multi layered thatch performed admirably at keeping out the heavy rain and inside was still dry and cosy. Not bad for an un-inhabited hut made of sticks!
After three winters without being lived in, just the same as pretty much any un-inhabited house it needs repairs. The central ridge bent and eventually broke under the load of thatch and snow. If the house had had permanent residents this problem would've been identified early and rectified. The mud daub cracked as it dried (which is apparently expected and perfectly normal) but weirdly I relished the opportunity to mix up another muddy concoction and get to work plastering over the cracks. Of course, the door is still going strong...
Wooden door latch in action. A buckskin loop is pulled from the inside to lift the latch clear of the retaining hook
 
So..what would I have done differently with hindsight? For starters I would have beefed up those supports. Although the house was only small, a damp, thatched roof plus snow weighs a hell of a lot - even more than me!  I may have looked at different roofing materials. Sheets of birch bark covered with turfs might have done the job or with the tools we had, enough time and patience we could have covered the whole thing in split, wood shingle tiles. I would have experimented with digging down a couple of feet to give more head room without such a large structure above ground. Our soil drains extremely well as we're up on a high wooded ridge on flint and chalk so with a good overhanging roof,  guttering trenches and a fire inside I don't think damp would've been an issue. With the small size of the structure we could only ever have a small fire for heating for fear of setting the roof alight. After coming up with the 'wimney' design I have since discovered that old thatched dwellings also allowed the smoke to permeate through the thatching (rather than leave a smoke hole chimney) because it created a 'damping' effect - a smoke ceiling above head height which smothered any lively sparks heading up towards the dry, wood tar covered thatch. A smoke hole actually encourages better draw and carries those cheerful bright sparks right on up to the tinder dry thatch. Possibly not the best idea after all! My next attempt might involve the building of a stone and clay fire place and chimney stack...
A home in the woods. Perhaps a glimpse into our past?